
Ever walked into a room and been like, “Dang, this floor’s got style, toughness, and didn’t cost an arm and a leg”? That’s vinyl roll flooring working its magic, turning boring spaces into Insta-worthy vibes on a budget. Think you can’t pull off installing it yourself? Think again! To install vinyl roll flooring, level your subfloor, measure and cut precisely, spread eco-friendly adhesive, lay the vinyl smoothly, seal seams, and roll it flat for a pro-grade finish. Picture your kitchen or living room rocking a sleek, durable floor you laid down over a weekend, leaving your friends shook at your DIY skills. Ready to make that floor pop? Grab a coffee, and let’s dive into the ultimate, no-fuss guide to installing vinyl roll flooring like a total boss!
What Tools and Materials Do You Need to Install Vinyl Roll Flooring?
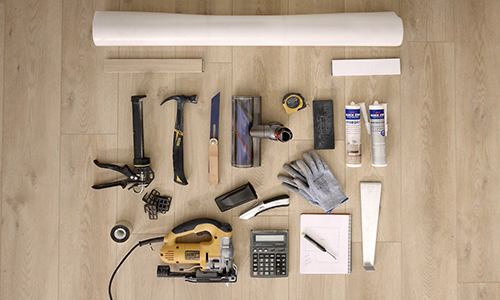
You need a utility knife, tape measure, straightedge, notched trowel, adhesive, seam sealer, and a floor roller. Prep sets you up for success.
Your Vinyl Flooring Toolkit
Which Tools Are Non-Negotiable?
You’ll want a sharp utility knife ($10-$15) for clean cuts, a 25-foot tape measure ($8-$12) for accuracy, a metal straightedge or T-square ($15-$20) for straight lines, a notched trowel ($10) for adhesive, and a 50-75 lb floor roller ($50-$100) to squash bubbles. Our factory’s vinyl rolls are crafted for easy cutting and handling with these basics.
What Materials Do You Need?
Grab your vinyl roll flooring (obviously!), acrylic-based floor adhesive ($20-$40 per gallon, covers ~150 sq ft), and liquid seam sealer ($10-$15) for joins. Optional: underlayment ($0.50-$1 per sq ft) for cushion or noise reduction. Our factory’s eco-friendly vinyl pairs perfectly with standard adhesives.
How Do You Keep Costs in Check?
Vinyl rolls run $1-$4 per square foot, so a 200 sq ft room might cost $200-$800 for material. Adhesive and tools add $100-$200, per 2024 Home Depot pricing. Renting a roller ($20/day) saves cash. Our factory’s durable vinyl cuts down on pricey repairs or replacements.
Are There Any Sneaky Extras?
A leveling compound ($15-$30 per bag) fixes uneven floors. Knee pads ($10-$20) save your joints during long installs. A moisture meter ($20-$40) checks for dampness. Our factory’s high-quality vinyl reduces the need for excessive subfloor fixes, keeping your wallet happy.
What About Safety Gear?
Gloves ($5) protect hands from adhesive, and a dust mask ($5-$10) is smart when sanding subfloors. Safety glasses ($5) guard against debris. Our factory’s non-toxic vinyl ensures safe handling, but gear up for subfloor prep.
| Item | Purpose | Estimated Cost | Pro Tips |
|---|---|---|---|
| Utility Knife | Cutting vinyl cleanly and precisely | $10–$15 | Always use a fresh blade for smooth edges |
| Tape Measure | Measuring floor area and cuts | $8–$12 | Use a 25-ft tape for room-length accuracy |
| Straightedge/T-square | Guiding straight cuts | $15–$20 | Helps avoid jagged or uneven seams |
| Notched Trowel | Spreading adhesive evenly | ~$10 | Use correct notch size (check adhesive instructions) |
| Floor Roller (50–75 lb) | Pressing vinyl down to prevent bubbles | Buy: $50–$100Rent: ~$20/day | Rent if doing a one-time project |
| Acrylic Adhesive | Bonding vinyl to subfloor | $20–$40/gallon | Covers ~150 sq ft; choose low-VOC for better indoor air quality |
| Seam Sealer | Sealing joints to prevent moisture entry | $10–$15 | Use a fine-tip applicator for clean lines |
| Vinyl Roll Flooring | Main material | $1–$4/sq ft | Buy 5–10% extra for mistakes or pattern matching |
| Optional Underlayment | Adds cushion or sound absorption | $0.50–$1/sq ft | Not always needed; check floor type and vinyl backing |
| Leveling Compound | Fixes dips or bumps in subfloor | $15–$30/bag | Crucial for older or uneven concrete/wood floors |
| Moisture Meter | Checks subfloor moisture (esp. concrete) | $20–$40 | Prevents adhesive failure due to dampness |
| Knee Pads | Protects knees during long installs | $10–$20 | Must-have for larger areas or slow jobs |
| Gloves | Protects hands from cuts and adhesives | ~$5 | Choose nitrile or rubber for grip and durability |
| Dust Mask & Glasses | Safety during sanding or prep | $5–$10 (each) | Especially useful in dusty or poorly ventilated areas |
Critical Perspective: Can You Cut Corners on Tools or Materials?
Skimping on a dull knife or cheap adhesive leads to ragged edges or peeling floors—total buzzkill. Quality tools and our factory’s premium vinyl ensure a smooth install that lasts, saving you from redo headaches.
How Do You Prepare the Subfloor for Vinyl Roll Flooring?
Clean, level, and dry the subfloor thoroughly before laying vinyl roll flooring. A solid base prevents bubbles, peels, or cracks.
Getting That Subfloor Ready to Roll
What’s the Subfloor Prep Checklist?
Vacuum or sweep away dust, dirt, or grease. Scrape off old adhesive or paint. Fill cracks with patching compound ($10-$15). Sand high spots with a belt sander ($20/day rental) and level dips with self-leveling compound ($20-$30). Our factory’s vinyl loves a flat, clean subfloor.
How Do You Fix an Uneven Subfloor?
Lay a 6-foot straightedge across the floor to spot bumps or dips. For lows, mix and spread self-leveling compound with a trowel (follow bag instructions). Sand or grind highs with 80-grit sandpaper. A 2024 flooring study found 65% of vinyl failures tie to uneven subfloors.
What’s the Deal with Moisture?
Test subfloor moisture with a meter ($20-$40)—readings over 4% spell trouble. Fix leaks, lay a 6-mil plastic vapor barrier ($10-$20), or apply a moisture sealant ($30-$50). Our factory’s water-resistant vinyl handles slight dampness, but a dry subfloor is key.
Why Can’t You Skip Subfloor Prep?
A rough or wet subfloor leads to adhesive failure, air pockets, or mold, cutting floor life by 5-10 years, per industry data. Proper prep ensures our factory’s vinyl sticks tight and looks flawless for decades.
How Do You Handle Different Subfloor Types?
Concrete needs leveling and moisture checks; plywood needs sanding and screw-tightening; old vinyl can stay if flat and secure. Our factory’s vinyl adapts to most subfloors with minimal fuss.
Critical Perspective: Is Subfloor Prep Overkill for DIYers?
Skipping minor cracks might seem fine, but even small flaws cause ripples or peels later. Over-prepping a near-perfect floor wastes time and cash. Our factory’s forgiving vinyl balances prep needs, making it DIY-friendly without obsessive leveling.
| Step | What to Do | Tools/Materials Needed | Why It Matters |
|---|---|---|---|
| 1. Clean the Subfloor | Sweep, vacuum, and remove all debris, grease, or old adhesive | Broom, vacuum, scraper | Ensures adhesive bonds properly; debris causes lumps or bubbles |
| 2. Remove Old Residues | Scrape off paint, glue, or wax | Floor scraper, adhesive remover ($10–$20) | Old residue can prevent vinyl from adhering properly |
| 3. Check for Flatness | Use a 6-foot straightedge to find dips or high spots | Straightedge, spirit level | Even a 1/8″ dip over 6 ft can cause vinyl to ripple or lift |
| 4. Fill Cracks or Dips | Use floor patch or self-leveling compound for dips/cracks | Patching compound ($10–$15), trowel | Creates a smooth, uniform surface for long-term durability |
| 5. Sand High Spots | Sand or grind raised areas to level the floor | Belt sander ($20/day rental), 80-grit sandpaper | Prevents bulges or poor adhesion under vinyl |
| 6. Test for Moisture | Use a moisture meter; ensure concrete is under 4% moisture | Moisture meter ($20–$40) | Too much moisture = adhesive failure or mold |
| 7. Apply Moisture Barrier | If needed, use 6-mil plastic sheet or liquid moisture sealant | Plastic sheeting ($10–$20), or sealant ($30–$50) | Essential on concrete or over crawl spaces to protect the vinyl |
| 8. Secure the Subfloor | Tighten screws on plywood; remove nails, staples, or loose vinyl | Screwdriver/drill | Loose boards or staples can cause bumps and early wear |
| 9. Optional Underlayment | For added cushion or noise reduction (check vinyl spec) | Foam or cork underlayment ($0.50–$1/sq ft) | Smooths out minor flaws and improves comfort underfoot |
How Do You Measure and Cut Vinyl Roll Flooring Accurately?
Measure room dimensions, add 10% for waste, and cut vinyl with a utility knife and straightedge. Precision cuts save material and time.
Measuring and Cutting Like a Pro
How Do You Measure for Zero Stress?
Measure room length and width with a tape measure, multiply for square footage (e.g., 10×12 ft = 120 sq ft), and add 10% for cuts or errors (120 + 12 = 132 sq ft). Sketch a layout to plan seams, avoiding high-traffic areas. Our factory’s wide vinyl rolls (6-12 ft) reduce seams.
What’s the Trick to Cutting Vinyl Clean?
Lay vinyl flat on a clean surface, mark measurements with a chalk line or pencil, and align a metal straightedge. Score with a utility knife, then cut in one smooth pass. For curves (like around toilets), make a cardboard template first. Our factory’s flexible vinyl cuts like butter.
How Do You Cut Down on Waste?
Plan cuts to use full roll widths in big areas, saving scraps for small spots like closets or hallways. A 2024 DIY report says smart planning cuts waste by 20%. Our vinyl’s consistent patterns make scraps easy to repurpose.
What If You Botch a Cut?
Small goofs can be patched with seam sealer ($10-$15) and a scrap piece. Big mistakes might need a new section—measure twice, cut once! Our factory’s vinyl blends patches seamlessly for invisible fixes.
Are There Tools to Make Cutting Easier?
A vinyl cutter ($50-$100) speeds up long cuts, but a steady hand and knife work fine. Chalk lines ($5) ensure straight marks. Our factory’s easy-to-cut vinyl doesn’t demand fancy gear.
Critical Perspective: Should DIYers Leave Cutting to Pros?
Pros nail complex layouts, but DIYers can handle simple rooms with patience and basic tools. Over-relying on gadgets like laser guides wastes money. Our factory’s user-friendly vinyl makes cutting accessible, even for newbies.
| Step | Action | Tools Needed | Pro Tips |
|---|---|---|---|
| 1. Measure the Room | Measure length × width of the floor in feet or meters. Multiply to get square footage. | Tape measure (25 ft), notebook | Add 10% extra for trimming and mistakes (e.g., 120 sq ft → order 132 sq ft). |
| 2. Sketch a Layout | Draw a basic room outline; plan how vinyl will be laid and where seams might fall. | Graph paper or drawing app | Avoid placing seams in high-traffic zones. Our wider vinyl rolls reduce seams altogether. |
| 3. Mark the Vinyl | Roll vinyl out flat. Use chalk or pencil to mark cuts based on your layout plan. | Chalk line ($5), pencil, metal straightedge | Use a cardboard template for curves (toilets, corners). |
| 4. Cut Straight Lines | Align a straightedge, score once with a utility knife, then slice cleanly through. | Utility knife ($10), metal straightedge or T-square ($20) | Cut on a clean, smooth surface to avoid rips. |
| 5. Cut Curves & Angles | Use your cardboard pattern to trace odd shapes, then cut slowly for accuracy. | Scissors (for soft vinyl), utility knife | Don’t rush curves—small snips work better than one deep cut. |
| 6. Reduce Material Waste | Use larger cuts in open spaces; use leftovers in closets or under appliances. | Your floor plan! | Our factory’s repeat patterns make scrap pieces blend in beautifully. |
| 7. Handle Mistakes | Use seam sealer for small flaws or replace larger sections if needed. | Seam sealer ($10–$15), scrap vinyl | “Measure twice, cut once.” Always test-fit before final cuts. |
| 8. Optional Tools | For speed, a vinyl cutter can help with long straight runs. | Vinyl cutter ($50–$100), knee pads, soft ruler | Not necessary for small jobs—our vinyl is DIY-friendly with just a knife and steady hand. |
How Do You Install Vinyl Roll Flooring Step-by-Step?

Install vinyl roll flooring by dry-fitting, spreading adhesive, laying the vinyl, rolling it flat, and sealing seams. Follow steps for a pro finish.
Laying That Floor Like a Legend
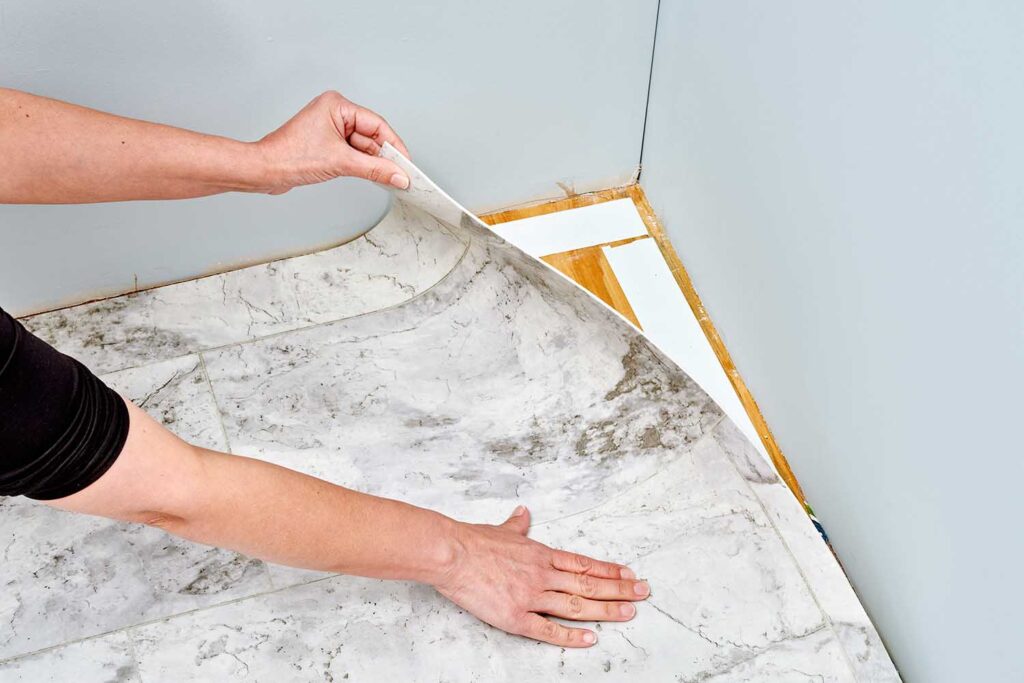
What’s the Step-by-Step Playbook?
- Unroll vinyl in the room to acclimate for 24-48 hours (prevents shrinking).
- Dry-fit, trimming edges to fit.
- Fold back half, spread adhesive with a notched trowel (per label).
- Lay vinyl, press out bubbles.
- Repeat for the other half.
- Roll with a 50-75 lb roller.
- Seal seams and trim edges. Our factory’s vinyl is prepped for easy adhesion.
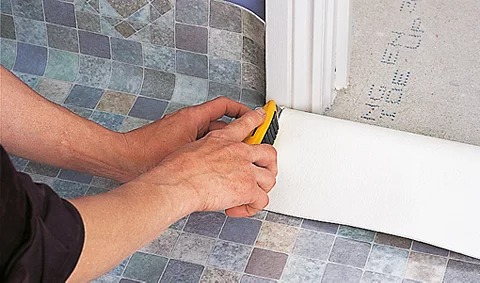
How Do You Nail Seams and Edges?
Overlap seams by 1-2 inches, cut through both layers with a straightedge and knife for a tight fit, then apply liquid seam sealer ($10-$15). Trim edges flush against walls with a knife. Our vinyl’s patterns align for invisible seams.
Which Adhesives or Methods Are Best?
Acrylic adhesives ($20-$40/gallon) work on concrete or wood subfloors; pressure-sensitive ones ($25-$50) allow repositioning. Glue-down is standard; loose-lay suits small rooms (<100 sq ft). Glue-down lasts 25% longer, per 2024 flooring data. Our vinyl pairs with eco-friendly adhesives for a green install.
How Do You Tackle Tricky Areas?
Cut relief slits at corners for smooth folding. Use paper templates for obstacles like pipes or doorframes. For stairs, cut strips and glue tightly. Our factory’s flexible vinyl molds to weird shapes without tearing.
What If You Hit a Snag?
Bubbles? Roll again with more pressure. Misaligned? Lift and reposition before adhesive sets (within 10-15 minutes). Our factory’s forgiving vinyl lets you fix mistakes without starting over.
Critical Perspective: Is DIY Installation Too Hard for Beginners?
Pros breeze through tricky layouts, but DIYers can crush simple rooms with clear steps and patience. Rushing or overcomplicating adhesive choices leads to flops. Our factory’s DIY-friendly vinyl simplifies the process for all skill levels.
| Step | Action | Tools Needed | Pro Tips |
|---|---|---|---|
| 1 | Acclimate the Vinyl (24–48 hrs in the room) | None | Prevents buckling or shrinkage after install. |
| 2 | Dry-Fit and Trim | Utility knife, tape measure, straightedge | Rough-cut vinyl to fit the room with 2–3″ excess. |
| 3 | Fold Back Half of the Vinyl | None | Fold evenly to avoid creasing the material. |
| 4 | Spread Adhesive on Subfloor | Notched trowel, adhesive (acrylic or pressure-sensitive) | Follow label for open time. Apply evenly to avoid lumps. |
| 5 | Lay Vinyl onto Adhesive | Hands or soft push broom | Lay gently, press from center outward to remove bubbles. |
| 6 | Repeat for Second Half | Same tools | Be precise where the two sides meet. |
| 7 | Roll Floor Flat | 50–75 lb floor roller (rent or buy) | Roll in both directions to bond vinyl and avoid air pockets. |
| 8 | Seal Seams | Utility knife, seam sealer ($10–$15), straightedge | Overlap 1–2″, double-cut through both layers, then apply sealer. |
| 9 | Trim Edges Along Walls | Utility knife, straightedge | Press vinyl tight to the wall, then trim for a flush fit. |
| 10 | Tackle Corners & Obstacles | Scissors, templates (paper/cardboard), knife | Use templates for toilets, pipes, or stairs. Cut relief slits to avoid bunching. |
| 11 | Fix Bubbles or Errors | Roller, utility knife (if needed) | Roll again immediately. Reposition within 10–15 mins if adhesive allows. |
How Do You Maintain and Care for Vinyl Roll Flooring After Installation?
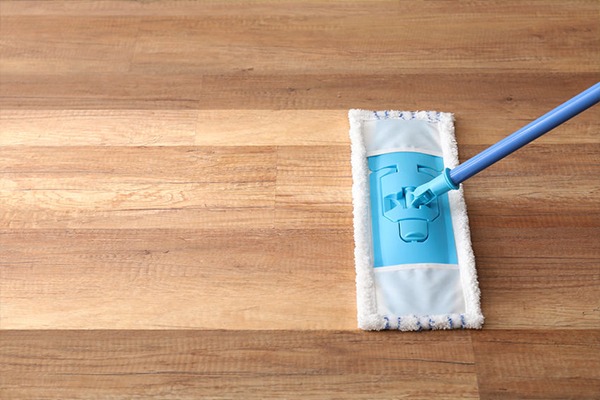
Sweep, mop with mild cleaner, and protect vinyl roll flooring from scratches. Regular care keeps it shiny and durable.
Keeping Your Floor Looking Fire
What’s the Go-To Cleaning Routine?
Sweep or vacuum (no beater bar) daily to ditch dust and grit. Mop weekly with warm water and a mild cleaner like Bona or Rejuvenate ($10-$15). Skip bleach or ammonia—they dull the shine. Our factory’s vinyl resists stains for easy cleanup.
How Do You Shield It from Wear?
Slap felt pads ($5-$10) under furniture legs, don’t drag heavy stuff, and toss doormats ($10-$20) at entrances to trap dirt. A 2024 study says 75% of vinyl damage is from scratches or scuffs. Our vinyl’s tough topcoat fights everyday wear.
What About Spills or Tough Stains?
Wipe spills pronto with a damp cloth. For stubborn stains like crayon or ink, dab with rubbing alcohol or vinegar on a soft cloth. Our factory’s stain-proof vinyl laughs off most messes without a trace.
Why Is Maintenance a Big Deal?
Consistent care extends vinyl life by 10-15 years, per industry stats. Neglect invites dullness, scratches, or UV fading. Our factory’s low-maintenance vinyl stays gorgeous with minimal effort, saving you time.
Can You Over-Clean Vinyl?
Harsh chemicals or abrasive scrubbers can strip the finish, but gentle cleaners and soft mops are safe. Over-mopping (like daily soaks) risks water seeping under seams. Our vinyl’s water-resistant design handles sensible cleaning like a champ.
Critical Perspective: Is Vinyl Care Easier Than It Seems?
Some hype vinyl as “no-care” flooring, but grit and spills still need attention to avoid wear. Overdoing it with fancy polishes is pointless. Our factory’s durable vinyl strikes the perfect balance—tough yet simple to maintain.
| Task | How Often | Tools/Products | Tips |
|---|---|---|---|
| Sweep or Vacuum | Daily or as needed | Soft-bristle broom or vacuum (no beater bar) | Removes grit that causes scratches. |
| Mop Floor | Weekly | Damp mop + mild vinyl floor cleaner (e.g., Bona, Rejuvenate) | Avoid bleach/ammonia-based products. Use warm water. |
| Wipe Spills Immediately | As needed | Damp cloth or paper towel | Prevents staining and water damage. |
| Treat Stains | As needed | Rubbing alcohol or vinegar on soft cloth | Crayon, ink, and scuff marks respond well to gentle solvents. |
| Protect from Scratches | Ongoing | Felt pads under furniture, entry mats | Don’t drag heavy items. Use rugs in high-traffic zones. |
| Avoid Over-Mopping | Always | Lightly damp mop only | Too much water can seep into seams over time. |
| Polishing or Waxing | Never | Not recommended for vinyl roll flooring | Our factory’s finish is designed to stay glossy without extra polish. |
Conclusion
Installing vinyl roll flooring is like giving your space a major glow-up—sleek, sturdy, and totally doable for DIYers with the right know-how. From leveling that subfloor to sealing those seams, this guide’s got your back with pro-level tips to make your floor a stunner. At Kinwin, we’re pumped to craft eco-friendly, high-quality vinyl roll flooring that’s a cinch to install and built to last through life’s chaos. Ready to level up your space with custom vinyl flooring? Reach out at [email protected] for a quote or to check out our sustainable lineup. Let’s get that dream floor laid and make your space the talk of the town!