
There’s something about a brand-new floor that just makes a room feel fresh, modern, and complete. SPC (Stone Plastic Composite) flooring is becoming super popular these days—and for good reason. It’s tough, water-resistant, and available in a ton of designs that can make even the simplest space look high-end. But before you rip up your old floors and dive into an SPC installation, it’s good to know exactly what you’re getting into.
To install SPC flooring, gather essential tools like a utility knife, measuring tape, spacers, rubber mallet, and an optional leveling compound. Acclimate the planks for 24–48 hours, prep and level your subfloor, then choose either click-lock or glue-down installation. Ensure you leave proper expansion gaps, align seams carefully, and follow the manufacturer’s guidelines.
Maybe you’ve heard horror stories about warped floors or boards that pop and squeak after just a few months. The truth is, a well-installed SPC floor can handle life’s wear-and-tear remarkably well—you just need a solid plan. Stick with us to learn the ins and outs of subfloor prep, acclimation, common mistakes, and so much more. We’ll even share real-world tips, data, and an easy-to-reference table or two so you can feel confident every step of the way.
1. What Tools and Materials Are Essential for Installing SPC Flooring?
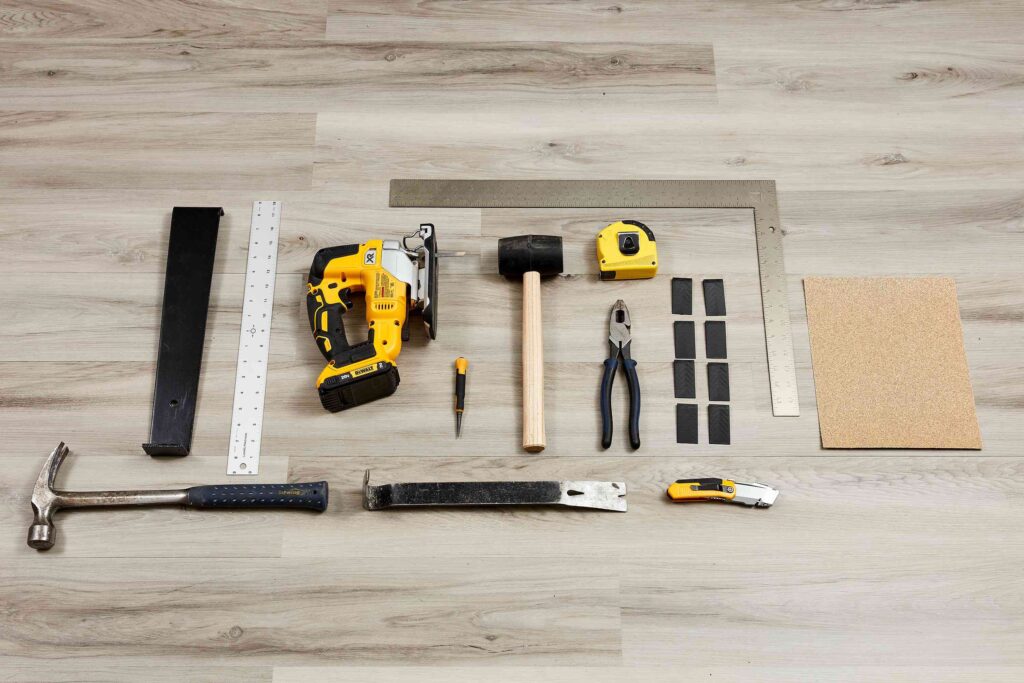
You’ll need a utility knife, rubber mallet, spacers, measuring tape, and safety gear. Additional items like a leveling compound, tapping block, and a chalk line can help you achieve a hassle-free, professional-looking installation.
From the Basics to Specialized Tools
If you’re a DIY enthusiast, having the right tools on hand often makes the difference between a smooth, enjoyable project and a total headache. Here’s a closer look at what you’ll be using:
1.1 Core Tool Kit Essentials
- Measuring Tape and Chalk Line
- Purpose: Ensures straight cuts and helps you lay your first row accurately.
- Tip: When measuring, double-check your dimensions—small mistakes at the start can snowball.
- Utility Knife (or Vinyl Cutter)
- Purpose: For cutting planks to fit against walls or around obstacles.
- Tip: Go slow and use a new blade; dull blades can cause jagged cuts.
- Rubber Mallet & Tapping Block
- Purpose: Helps secure planks together without damaging their edges.
- Tip: A gentle tap is enough; whacking too hard can break locking mechanisms.
- Spacers
- Purpose: Maintains proper expansion gaps along the room’s perimeter.
- Tip: A standard 1/4-inch gap works for many SPC floors, but always confirm with the manufacturer.
- Safety Gear
- Purpose: Protects your eyes from flying debris and your hands from cuts.
- Tip: Comfortable gloves help prevent blistering if you’re installing a large area.
1.2 Optional but Helpful Extras
- Leveling Compound
- Purpose: Fixes minor dips or uneven spots in your subfloor.
- Tip: Follow the packaging’s dry-time instructions to avoid trapping moisture.
- Oscillating Tool or Jamb Saw
- Purpose: Trimming door frames, notches, or other tricky spots with precision.
- Tip: Practice on a scrap piece of wood before cutting your actual trim.
- Underlayment (If Not Pre-Attached)
- Purpose: Provides extra sound insulation and can smooth out minor flaws.
- Tip: Some SPC floors come with built-in underlayment. If yours does, a second layer might be unnecessary—or even counterproductive.
Check out the sample reference table below to compare tool options and decide what best suits your skill level and budget:
| Tool/Material | Purpose | Approx. Cost | Recommended for |
|---|---|---|---|
| Utility Knife | Cutting planks | $5–$15 | All installations, DIYers |
| Rubber Mallet | Tapping planks together | $5–$20 | Preventing damage to edges |
| Spacers | Maintaining expansion gaps | $3–$10 (pack) | Consistent perimeter gaps |
| Leveling Compound | Smoothing subfloor irregularities | $15–$50 (per bag) | Older or uneven subfloors |
| Oscillating Tool | Precision cuts for door frames & corners | $40–$150+ | Complex layouts, door jamb undercuts |
2. How Do You Properly Prepare the Subfloor Before Installation?
Make sure the subfloor is clean, level, and dry. Sweeping, vacuuming, and addressing high or low spots with a leveling compound are crucial steps for a long-lasting floor.
It’s All About That Foundation
Think of your subfloor like the foundation of a house. If it’s wobbly or flawed, every new layer you add will carry those flaws forward—sometimes magnified.
2.1 Cleanliness First
- Debris Removal
- Even small pieces of dirt or grit can cause bumps under SPC planks.
- Use a shop vac for a thorough clean, especially if your space is large.
- Check for Grease or Wax
- Residue from previous floors can interfere with adhesives or create slick spots.
- A mild solvent or degreaser can do wonders.
2.2 Leveling Matters
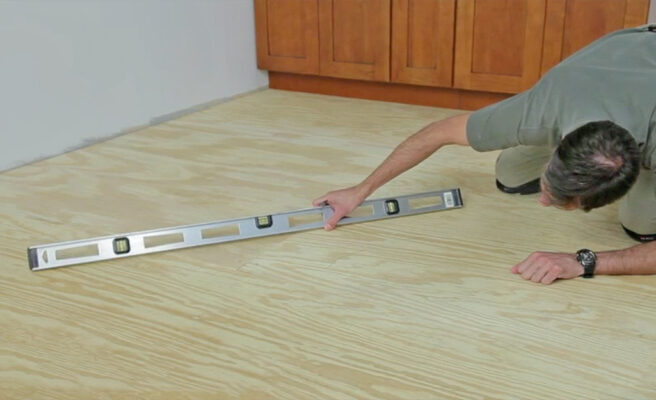
- Identify Low Spots and Cracks
- Concrete Subfloors: Use a long level or straightedge to detect dips over 1/8 inch.
- Wood Subfloors: Watch out for squeaky boards or warping.
- Applying Leveling Compound
- Mix according to instructions; different brands might have unique pot life (the time you have before the compound starts hardening).
- Pour and let it self-level. Use a long-handled trowel if needed.
- Drying Time
- Don’t rush this step. If your leveling compound isn’t fully cured, you could end up trapping moisture under the planks.
2.3 Moisture Testing
- Concrete Slabs: Use a simple moisture meter or calcium chloride test kit. If levels are too high, consider a vapor barrier.
- Wooden Subfloors: Watch for signs of rot or dampness. Mold smells or discoloration are red flags.
| Step | Key Actions & Considerations |
|---|---|
| Cleanliness First | Remove all debris, dust, and dirt using a shop vac. Even small particles can cause bumps under SPC planks. |
| Check for Grease/Wax | Residue from previous flooring can affect adhesion. Use a mild solvent or degreaser if needed. |
| Identify Low Spots & Cracks | Use a level or straightedge to detect dips over 1/8 inch. Watch for warping or squeaky boards on wood subfloors. |
| Applying Leveling Compound | Mix according to instructions, pour onto dips, and allow it to self-level. Use a long-handled trowel if needed. |
| Drying Time | Let the compound fully cure before proceeding. Rushing this step can lead to trapped moisture and future damage. |
| Moisture Testing (Concrete Subfloors) | Use a moisture meter or calcium chloride test kit. High moisture levels require a vapor barrier. |
| Moisture Testing (Wood Subfloors) | Look for mold, discoloration, or a damp smell—signs that repairs may be necessary before installation. |
Putting in a little extra elbow grease at this stage can save you from annoying squeaks, plank gaps, or moisture damage later on. It might not be the most glamorous part of the job, but a well-prepared subfloor is like gold.
3. Which Installation Methods Are Available: Click-Lock vs. Glue-Down?

Most SPC floors use either a click-lock “floating” method or a glue-down approach. Each has pros and cons, so pick the one that suits your subfloor, experience level, and usage needs.
Choosing the Right Approach
There’s no universal “best” method; it boils down to what you’re comfortable with and the conditions in your space.
3.1 Click-Lock (Floating Floor)
- How It Works
- Planks “click” together at the edges and float above the subfloor. No glue is involved.
- Great for DIYers or quick installations.
- Pros
- Simplifies repairs: you can replace individual planks.
- Subfloor damage is minimal because you’re not applying adhesive.
- Usually faster to install than glue-down.
- Cons
- Must be diligent about leaving expansion gaps and ensuring the subfloor is level.
- Slightly more prone to movement underfoot if subfloor prep is lacking.
3.2 Glue-Down
- How It Works
- Adhesive is applied to the subfloor in sections, and planks are laid on top.
- Common in commercial environments or high-traffic areas.
- Pros
- Very sturdy and less likely to shift over time.
- Can handle heavy furniture or rolling traffic without as much risk of plank movement.
- Cons
- Harder to replace individual planks if they get damaged.
- Mistakes in adhesive application can lead to big headaches—like planks not bonding correctly or adhesive seeping out.
3.3 Quick Overview Table
| Method | Best For | Installation Speed | Ease of Repair | Experience Needed |
|---|---|---|---|---|
| Click-Lock | DIYers, residential spaces | Faster (fewer steps) | Easy to fix planks | Moderate (requires precision) |
| Glue-Down | Commercial or high-traffic areas | Slower (more prep) | Harder to fix | Higher (adhesive application) |
If you’re torn, think about your ultimate goals: a floating floor might be ideal if you anticipate possibly changing planks down the road, while glue-down can offer peace of mind in a busy commercial setting.
4. Are There Specific Steps You Need to Follow During the Installation Process?
Yes—measure, mark a straight guide, place the first row carefully with spacers, and then continue row by row, ensuring each plank locks or bonds properly and you maintain expansion gaps around the perimeter.
A Step-by-Step Roadmap
A methodical approach is key. Installing an SPC floor is a bit like solving a puzzle; once you figure out the pattern and the necessary spacing, it all comes together smoothly.
4.1 Measure and Mark the Room
- Calculate Square Footage
- Add 5–10% extra to account for off-cuts and mistakes.
- Double-check: rooms that look square might be slightly angled.
- Plan Your Plank Orientation
- Laying planks parallel to the longest wall often looks best.
- Or run them toward a window so the seams catch the light for a more dramatic effect—totally up to your style preference.
- Chalk Line
- Snap a chalk line for your first row. This helps keep everything square.
- If you skip this, minor misalignments can get worse by the last row.
4.2 Laying the First Row
- Use Spacers Against Walls
- Typically 1/4 inch, but always confirm your product’s recommendation.
- These gaps allow for slight expansion in changing temperatures.
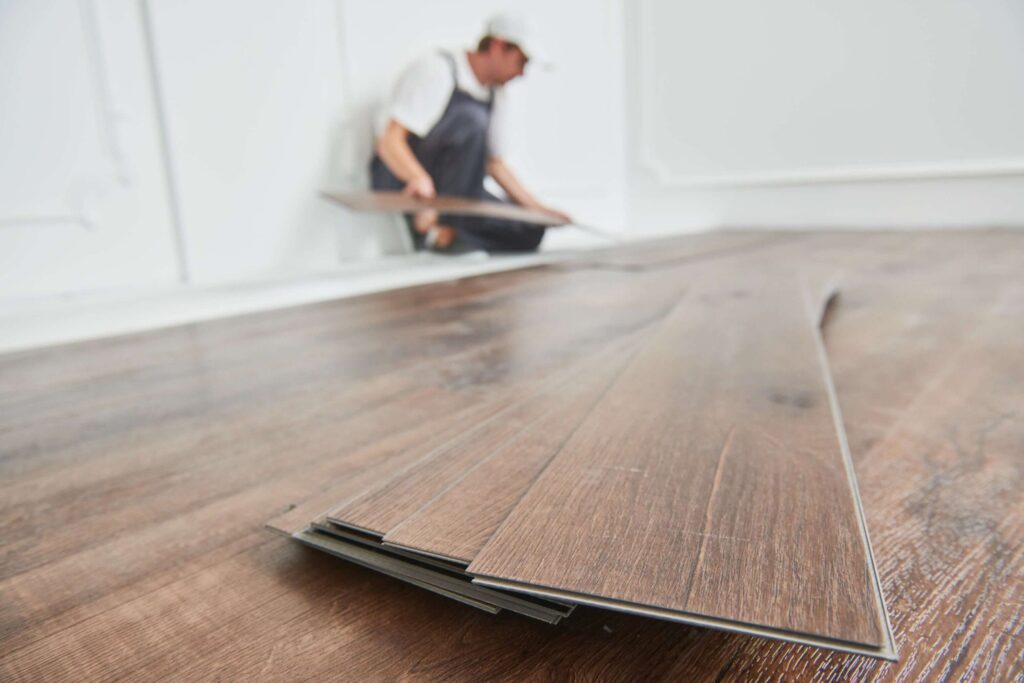
- Interlocking (or Adhering) Planks
- For click-lock, gently angle the plank into the adjoining edge and tap with your mallet and tapping block.
- For glue-down, spread adhesive evenly, press the plank firmly, and check for any adhesive oozing out.
- Avoid Very Short Planks
- If the last plank in your row only leaves a tiny leftover piece (less than 6 inches), consider cutting the first plank shorter so the last piece is a more reasonable length.
4.3 Continuing with Subsequent Rows
- Stagger Joints
- Start each new row with a leftover piece from the previous row if it’s long enough.
- Maintain at least 6–8 inches of stagger between seams for a stable and visually appealing pattern.
- Check Alignment Periodically
- Every few rows, step back and see if your lines are staying straight.
- Gaps or crooked planks are easier to correct early on.
- Working Around Doorways and Obstacles
- Cut planks carefully around door jambs, cabinets, or floor vents.
- Sometimes it’s easier to remove door trim temporarily for a cleaner fit.
4.4 Final Row and Finishing Touches
- Last-Row Fit
- Chances are you’ll need to cut the last row lengthwise. Measure meticulously!
- Insert spacers at the wall edge again.
- Install Moldings and Transition Strips
- Baseboards or quarter-round moldings cover your expansion gaps around the perimeter.
- Transition strips connect your new SPC floor to adjacent flooring materials.
| Step | Key Actions & Considerations |
|---|---|
| Measure and Mark the Room | Calculate square footage (add 5–10% for waste). Check room angles to ensure squareness. Plan plank orientation for best visual effect. Use a chalk line to keep the first row straight. |
| Laying the First Row | Use 1/4-inch spacers against walls for expansion gaps. Click-lock planks at an angle and tap gently or apply adhesive evenly for glue-down. Avoid very short planks (under 6 inches) by adjusting the first plank. |
| Continuing with Subsequent Rows | Stagger plank joints by at least 6–8 inches for stability. Use leftover pieces to start new rows when possible. Check alignment every few rows to ensure straight lines. Carefully cut planks around doorways, cabinets, or vents. |
| Final Row and Finishing Touches | Cut the last row lengthwise to fit properly. Reinsert spacers at the wall. Install moldings or quarter-round to cover expansion gaps. Use transition strips where flooring changes. |
Go slow and steady, especially in trickier areas. Once you find your rhythm, you’ll see the room transform plank by plank.
5. Do You Need to Acclimate SPC Flooring and How Long Does It Take?
Yes, typically for 24–48 hours in the room where it will be installed. This helps the planks adjust to local temperature and humidity.
The Role of Acclimation
Even though SPC floors are more stable than many other types of vinyl or laminate, they can still expand or contract slightly in response to environmental changes.
5.1 Why It’s Important
- Temperature Adaptation
- If your planks were stored in a chilly warehouse and your home is warm, a quick jump in temperature might cause them to expand.
- Acclimation prevents them from expanding after installation, which could strain the lock joints.
- Humidity Levels
- Although SPC floors are water-resistant, humidity can still affect the core material.
- Allowing planks to “breathe” in the actual room environment keeps them more stable down the road.
5.2 Proper Acclimation Method
- Store Boxes Indoors
- Keep them flat (not upright) and avoid extreme temperature swings.
- If your home is especially cold or hot, give it a day or two for the climate control to stabilize.
- Open or Closed Box?
- Manufacturer guidelines vary. Some suggest opening the boxes for better air circulation, while others recommend leaving them sealed.
- Follow the instructions printed on the packaging or consult the brand’s website for specifics.
- Minimum Timeframe
- 24 hours is often considered the bare minimum.
- 48 hours is safer if you can spare the time, especially in regions with extreme weather.
| Factor | Key Actions & Considerations |
|---|---|
| Acclimation Needed? | Yes, typically for 24–48 hours in the room where it will be installed. |
| Why It’s Important? | Prevents expansion/contraction issues after installation, protecting the lock joints and preventing lifted edges. |
| Temperature Adaptation | Planks stored in a cold warehouse may expand in a warm home, potentially causing strain on the locking system. |
| Humidity Levels | While SPC is water-resistant, acclimation helps prevent slight shifts due to humidity changes. |
| Proper Acclimation Method | Store boxes flat indoors, avoiding extreme temperature fluctuations. Keep the climate control stable before installation. |
| Open or Closed Boxes? | Follow manufacturer guidelines—some suggest opening for air circulation, while others recommend leaving them sealed. |
| Minimum Timeframe | 24 hours is the minimum, but 48 hours is safer, especially in areas with extreme weather conditions. |
Taking a little break to let the planks adjust could save you big headaches in the long run—like cracks at the seams or lifted edges. If your schedule allows, let them acclimate for the full recommended period (or even a tad longer).
6. What Are the Common Mistakes to Avoid When Installing SPC Flooring?
Skipping subfloor prep, ignoring expansion gaps, and rushing the process are top missteps. These can lead to squeaks, plank separation, or buckling down the line.
Sidestepping the Pitfalls
Learning from others’ mistakes is much less painful than making your own.
6.1 Neglecting Subfloor Imperfections
- Why It Matters: Tiny lumps or dips might seem harmless, but they can cause floors to pop, squeak, or even crack.
- How to Avoid: Spend an extra hour or two leveling and cleaning. It’s a fraction of the time you’d invest in fixing big problems later.
6.2 Inconsistent or Missing Expansion Gaps
- Why It Matters: SPC is stable, but it’s not immune to slight expansion in hotter or more humid conditions. Without gaps, the floor can push against walls and buckle.
- How to Avoid: Use spacers consistently. Don’t assume you can “eyeball” the gap accurately.
6.3 Using the Wrong Adhesive (for Glue-Down)
- Why It Matters: Adhesives are formulated differently. A general-purpose glue might not bond well to SPC.
- How to Avoid: Check the flooring brand’s recommended adhesive. Buying a premium adhesive is almost always worth it.
6.4 Rushing Installation
- Why It Matters: Hurrying can lead to crooked rows, uneven seams, or misaligned joints—fixing those can be a nightmare.
- How to Avoid: Take breaks, step back to assess your progress, and remember that speed is not your goal; accuracy is.
| Common Mistake | Why It Matters | How to Avoid It |
|---|---|---|
| Neglecting Subfloor Imperfections | Uneven surfaces can cause planks to pop, squeak, or crack over time. | Take extra time to level and clean the subfloor before installation. |
| Inconsistent or Missing Expansion Gaps | Without proper gaps, floors may buckle due to heat or humidity changes. | Use spacers consistently—don’t rely on estimation. |
| Using the Wrong Adhesive (for Glue-Down) | General-purpose glue may not properly bond to SPC, leading to weak adhesion. | Always use the manufacturer-recommended adhesive for best results. |
| Rushing Installation | Leads to crooked rows, uneven seams, and misaligned joints, making future repairs difficult. | Take your time, check alignment regularly, and focus on accuracy over speed. |
In the grand scheme, thoroughness beats haste every time. A little patience now means a gorgeous, problem-free floor for years to come.
7. When Should You Seek Professional Installation Services?
If your space has severe subfloor issues, you’re pressed for time, or you need a large commercial job done fast, hiring pros ensures a higher chance of a smooth, warranty-backed result.
The Pros of Hiring the Pros
Going DIY can be rewarding, but certain scenarios scream for professional help.
7.1 Large-Scale or Commercial Spaces
- High-Traffic Demands
- Restaurants, retail stores, or offices often see far more foot traffic than a home.
- Mistakes can be costly if you need to pause business or tear out the floor shortly after installation.
- Deadlines
- Pros can bring in bigger crews, finishing large jobs quickly.
- If opening day is around the corner, you might not have the luxury of a slow DIY approach.
7.2 Complex Floor Plans or Obstacles
- Odd-Shaped Rooms
- Angled walls or multiple doorways can complicate layouts.
- Pros have more experience making it all line up seamlessly.
- Multiple Layers of Old Flooring
- Stripping or safely disposing of older floors (especially if they contain asbestos or lead) requires special gear and training.
7.3 Warranty and Peace of Mind
- Manufacturer Requirements
- Some flooring brands specify that a certified installer must handle the job for the warranty to remain valid.
- Labor Guarantees
- Many contractors offer a labor warranty, meaning they’ll fix any post-installation issues for free within a certain timeframe.
Hiring professionals can be especially handy when dealing with time-sensitive projects or subfloor nightmares. Plus, there’s that comforting feeling of knowing you’ve got a fallback plan if something goes wrong.
8. Are There Post-Installation Care Tips to Extend the Floor’s Lifespan?
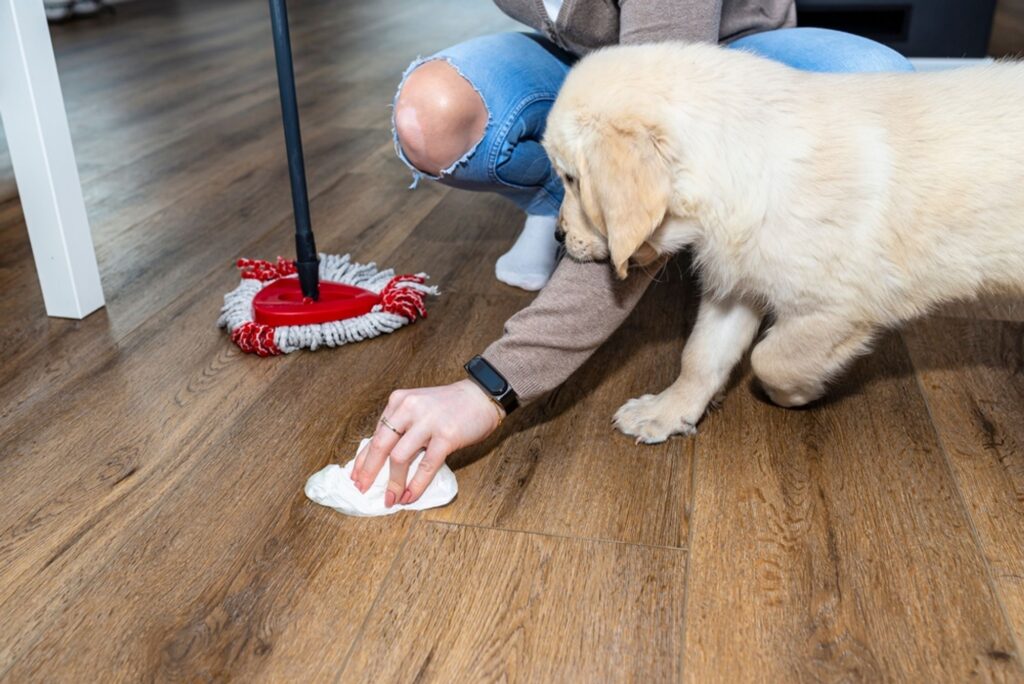
Sweep or vacuum regularly, clean up spills right away, and use gentle, pH-neutral cleaners. Felt pads under furniture and occasional inspections help keep your SPC floor looking like new.
Caring for Your Investment
You’re finally done installing your SPC floor, and it looks great—now let’s keep it that way.
8.1 Immediate Cleanup and Protection
- Remove Debris
- Sweep up any remaining dust or scraps.
- A gentle damp mop with a mild vinyl-friendly cleaner can wipe away chalk lines or adhesive residue.
- Furniture Placement
- If you’re moving heavy objects like a fridge or sofa, consider using sliders or plywood sheets to distribute weight.
- Felt pads under chair and table legs can minimize scratches.
8.2 Regular Maintenance Routine
- Daily or Weekly Cleaning
- Sweep or Vacuum: Grit can cause micro-scratches. A quick sweep goes a long way.
- Damp Mopping: Use a pH-neutral cleaner specifically made for vinyl or SPC.
- Spill Management
- Even though SPC is water-resistant, letting water or liquid sit too long can cause staining near plank edges.
- Always wipe up spills ASAP.
- Avoid Harsh Chemicals
- Bleach or ammonia-based cleaners could degrade the wear layer over time.
- Check your floor’s documentation for do’s and don’ts.
8.3 Long-Term Preservation
- Monitor Humidity Levels
- Most SPC floors do best in environments with 35–55% humidity.
- In extremely dry or humid climates, consider using a humidifier or dehumidifier.
- Inspection and Minor Repairs
- Spot any lifting or separating planks early, so you can re-seat or replace them before the issue spreads.
- Keep a few spare planks on hand in case you need to swap out a damaged one.
| Care Tip | Key Actions & Considerations |
|---|---|
| Immediate Cleanup & Protection | Sweep up dust and debris after installation. Use a damp mop with a mild vinyl-friendly cleaner to remove adhesive residue. |
| Furniture Placement | Use sliders or plywood when moving heavy objects to prevent damage. Apply felt pads under chair and table legs to minimize scratches. |
| Regular Maintenance Routine | Sweep or vacuum daily/weekly to prevent micro-scratches. Use a pH-neutral cleaner designed for SPC floors when mopping. |
| Spill Management | Wipe up spills immediately to prevent potential staining near plank edges, even though SPC is water-resistant. |
| Avoid Harsh Chemicals | Do not use bleach, ammonia, or abrasive cleaners, as they can degrade the wear layer over time. |
| Monitor Humidity Levels | Keep indoor humidity between 35–55% to maintain floor stability. Use a humidifier or dehumidifier in extreme climates. |
| Inspection & Minor Repairs | Regularly check for lifting or separating planks. Keep spare planks on hand for quick replacements if needed. |
Remember, an SPC floor is an investment. A consistent, gentle maintenance routine ensures you get maximum beauty and longevity—without busting your budget.
Conclusion: Ready to Transform Your Space? Contact Kinwin
Installing SPC flooring can be a fantastic way to upgrade your home or commercial space, combining durability, water resistance, and stylish design into one package. With the right prep work—from subfloor leveling to careful acclimation—you can enjoy a smooth, hassle-free project. Whether you’re a weekend DIY warrior or leaning toward hiring professionals, the steps we’ve covered offer a roadmap to success.
By following best practices—like using the correct tools, leaving proper expansion gaps, and cleaning up thoroughly—you’ll set your new floor up to look amazing for years. And if you’re still on the fence about certain details or simply want a custom SPC solution tailored to your unique requirements, reach out to Kinwin. We’ve got the expertise and quality materials to guide you through every stage, from product selection to final touches.
Get in touch today for a personalized quote or more detailed advice. Let’s transform your space into something you’ll love walking (and living) on—day after day, year after year.