

Les revêtements de sol en vinyle ont vu leur popularité exploser grâce à leurs designs attrayants, leur prix abordable et leur grande durabilité. Pourtant, même les lames de vinyle les plus haut de gamme peuvent ne pas répondre aux attentes si vous précipitez l'installation ou négligez des détails cruciaux. Après tout, personne n'a envie de consacrer du temps, de l'argent et de la sueur à un nouveau sol pour constater, quelques mois plus tard, que les lames sont déformées, qu'il y a de vilains interstices ou que les bords s'écaillent. Quelles sont donc les erreurs les plus courantes à éviter pour que votre sol en vinyle conserve sa fraîcheur pendant des années ?
The most frequent vinyl plank installation mistakes include sloppy subfloor prep, skipping acclimation, failing to leave expansion gaps, and ignoring layout planning. These errors often lead to buckling, gaps, or uneven surfaces that can drastically reduce your floor’s lifespan. Taking the time to properly prep, measure, and follow manufacturer guidelines helps ensure a flawless, long-lasting result.
Imagine you’ve finally picked the perfect vinyl plank—maybe it mimics rustic oak or sleek marble—only to end up with planks popping up or misaligned after the first few weeks. Avoid that sinking feeling by following these tips on what not to do. In the sections below, we’ll walk you through everything from essential tools and subfloor prep to proper layout and finishing touches, all while keeping it real with everyday language and practical examples.
I. Introduction: What Are the Most Common Mistakes When Installing Vinyl Plank Flooring?
Typical mistakes include rushing subfloor prep, skipping plank acclimation, disregarding expansion gaps, misaligning seams, and ignoring the manufacturer’s instructions. Each oversight can result in instability, visible damage, or a shorter lifespan for your vinyl floor.
Understanding How Mistakes Happen
- A Lack of Patience
- Instant Gratification: Vinyl plank is known for quick installations, but trying to power through it in a single afternoon can lead to errors.
- Ignoring Drying Times: If adhesives or self-leveling compounds aren’t given enough time to cure, your planks might shift or peel.
- Misunderstood Product Specs
- Variations Between Brands: Not all vinyl planks have the same thickness, wear layer, or locking mechanism. Overlooking these details can sabotage your project.
- Failing to Read Manuals: A quick glance at the box isn’t enough. Brands often include detailed instructions and recommended adhesives or underlayment.
- Real-Life Environments
- Kids, Pets, and Life: High foot traffic, messy spills, and shifting furniture can push your floor to its limits. Installation short-cuts only amplify these stresses.
- Regional Climate: A place with high humidity or dramatic temperature swings needs extra care (e.g., thorough acclimation, stable room temps during installation).
- Skipping Professional Advice
- DIY Confidence: Going the DIY route is great—vinyl plank is a friendlier option than hardwood or tile. But a bit of expert insight can fill in knowledge gaps and reduce rookie mistakes.
- Warranties: Many manufacturers won’t honor warranties if instructions aren’t followed. Even a small installation misstep could void your floor’s protection.
- Long-Term Impact
- Costly Fixes: Lifting planks to re-level the subfloor or fix seam gaps can mean redoing large sections of your floor—and paying extra.
- Frustration Factor: It’s disheartening to see all your effort undone by a small oversight. Proper prep and planning save you from major headaches later on.
II. Which Tools and Materials Do You Need for a Proper Installation?
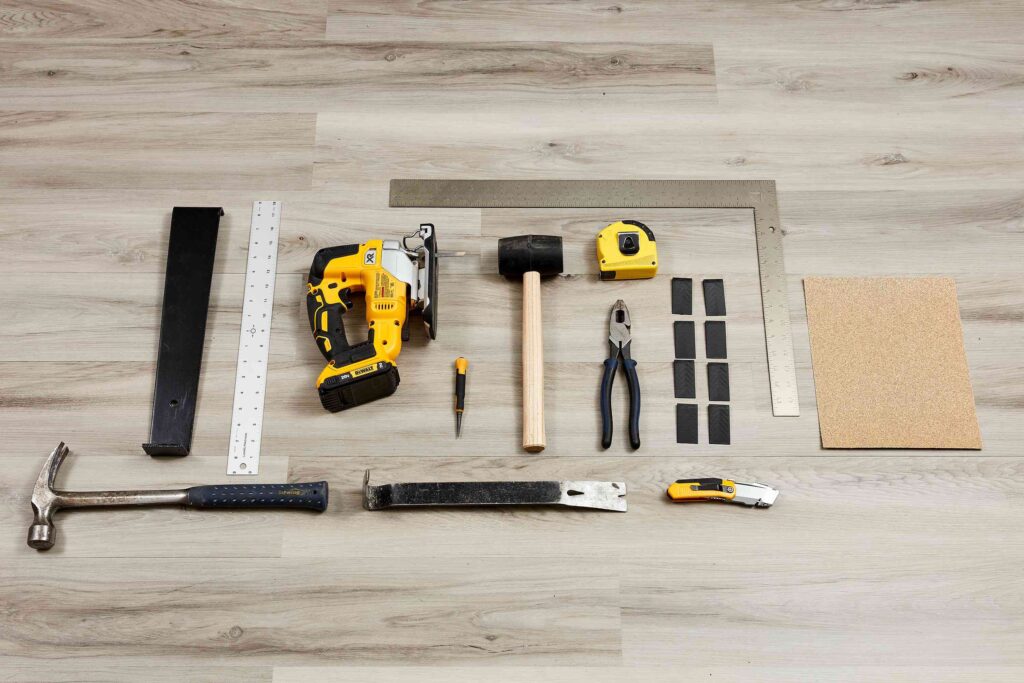
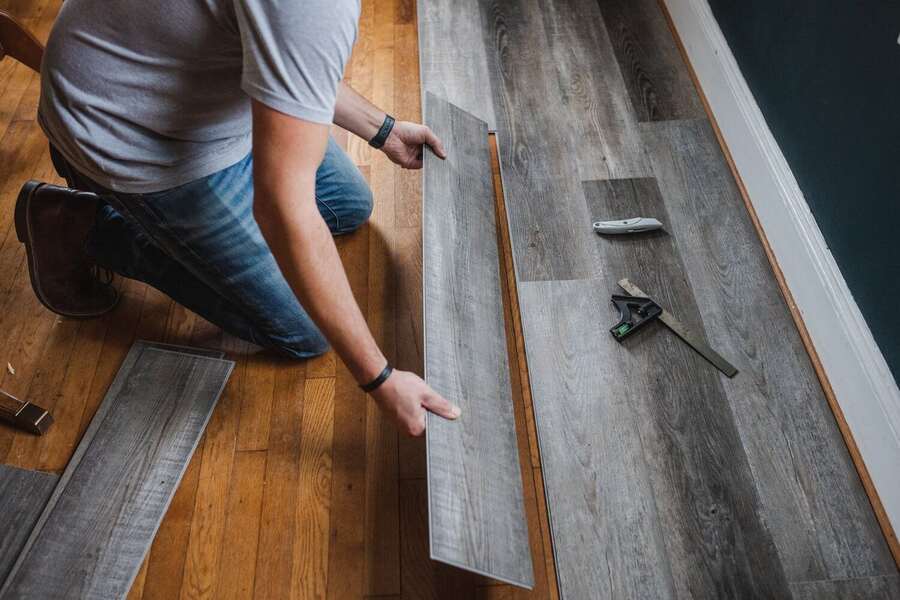
You’ll need a tape measure, utility knife, spacers, tapping block, soft mallet, and possibly underlayment or a moisture barrier. Safety gear (knee pads, goggles) and a few extra blades also prevent mishaps during cutting and kneeling.
Assembling Your Toolkit
- Measuring and Marking
- Ruban à mesurer: Accurate measurements lay the groundwork for neat seams and fewer wasted planks.
- Crayon ou craie: Marking where cuts go can be the difference between perfect edges and out-of-sync lines.
- Outils de coupe
- Couteau utilitaire: Many vinyl planks are “score and snap.” A sharp knife is crucial—dull blades cause ragged edges and potential slip-ups.
- Scie sauteuse ou circulaire: Thicker or rigid-core vinyl might need more heft than a simple snap. Power tools also help with awkward notches around vents or door frames.
- Aides à l'installation
- Entretoises: Maintain a consistent gap (usually around 1/4 inch) at walls to let the floor breathe.
- Tapping Block & Soft Mallet: Lock planks together tightly without damaging edges or the locking mechanism.
- Underlayment/Moisture Barrier
- Sound and Comfort: Underlayment can dampen noise and add a softer feel underfoot.
- Contrôle de l'humidité: If you’re on a concrete slab or in a basement, a moisture barrier is often essential.
- Safety & Comfort Equipment
- Genouillères: Installation is tough on your knees—protect them for a more comfortable, efficient project.
- Work Gloves & Goggles: Especially important if you’re working with power saws or handling sharp planks.
Ready-to-Use Tools/Materials Table
| Outil/matériel | Objectif | Recommended Use Frequency |
|---|---|---|
| Ruban à mesurer | Accurate floor & plank measurements | En permanence |
| Couteau utilitaire | Scoring & snapping vinyl planks | Frequent cuts |
| Scie sauteuse/scie circulaire | Handling thick/rigid planks or complex angles | Occasional (special cuts) |
| Entretoises | Preserving expansion gap at edges | Each row, perimeter of the room |
| Bloc de taraudage | Gently lock planks without damage | Every row or two |
| Sous-couche | Cushioning, noise reduction, optional moisture barrier | Depending on subfloor & brand |
| Genouillères | Protect knees during extended kneeling | Entire installation period |
Having everything ready from the start cuts down on stressful store runs in the middle of your project.
III. How Important Is Subfloor Preparation?
It’s vital. A poorly prepared subfloor—uneven, dirty, or damp—results in warped planks, popping seams, and a generally unstable floor. Level, clean, and dry conditions ensure your vinyl flooring lasts and looks its best.
Laying the Right Foundation
- Cleanliness Is Key
- Dust & Debris: Even a stray pebble can create a bump under vinyl, leading to premature wear. Vacuum and sweep thoroughly.
- Adhesive Remnants: If you pulled up old carpets or vinyl, remove every tack, staple, and leftover adhesive patch. These lumps can wreak havoc on alignment.
- Leveling the Surface
- Identify Irregularities: Use a spirit level or a straight 2×4 to locate dips or high spots. Minor ones can be sanded; bigger dips often need a leveling compound.
- Concrete vs. Wood: Concrete subfloors typically require leveling compounds if not poured evenly. Wood subfloors may need fresh plywood or patched spots.
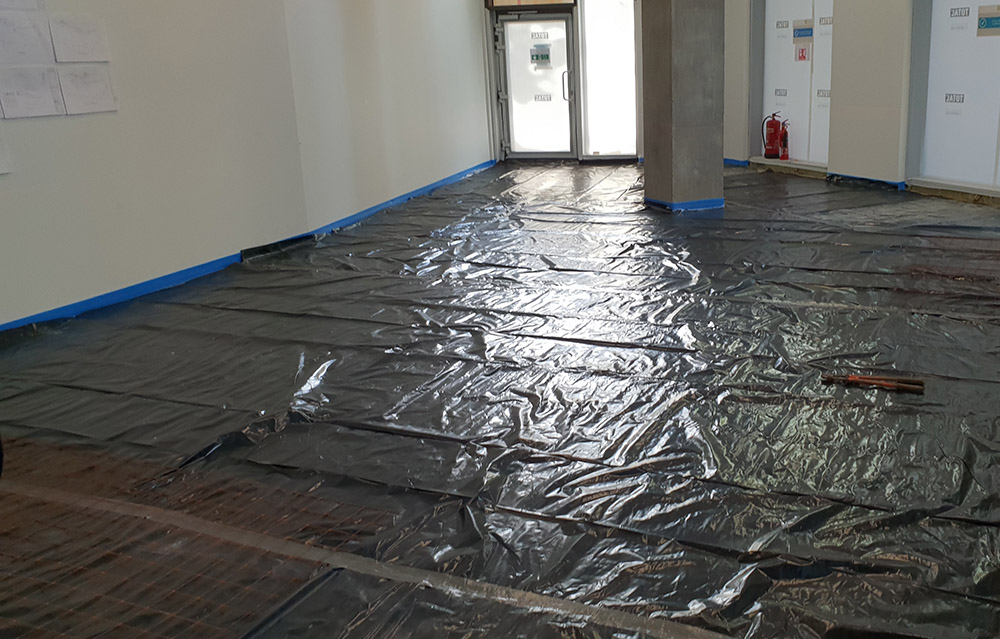
- Contrôle de l'humidité
- Concrete Slabs: A simple tape test (taping plastic sheets to the floor to see if condensation collects) can reveal high humidity. A moisture barrier might be essential.
- Wood Subfloors: Rot or mold can be an issue if the wood is damp. Replace compromised boards, and ensure dryness before installation.
- Quand utiliser une sous-couche
- Comfort & Sound: Underlayment can reduce click-clack noises and offer a bit of thermal insulation.
- Brand Recommendations: Some vinyl planks come with an attached underlayment—adding a second layer may void warranties or alter lock angles.
- Time vs. Benefit
- Extra Day for Prep: Spending an extra day ensuring level, debris-free surfaces can save years of trouble.
- Préparation au saut à la corde: You might see immediate lumps or buckling. Over time, the floor may degrade rapidly, and repairs typically cost more than if you’d done it right initially.
Conseil de pro: Keep a vacuum handy throughout installation. Occasionally remove dust or offcuts that accumulate as you lay planks. A dust-free environment keeps the locking mechanism clean and tight.
IV. What Not to Do When Installing Vinyl Plank Flooring (Acclimation, Temperature, and More)?
Avoid skipping acclimation, installing in extreme temperatures, misusing adhesives, or rushing your layout. Each misstep can lead to seam gaps, buckled planks, and a floor that ages prematurely.
Critical Pitfalls to Steer Clear Of
- Skipping Acclimation
- Pourquoi c'est important: Vinyl planks respond to temperature and humidity. Installing them fresh from a chilly garage into a warm room can result in expansion or contraction issues.
- Recommended Duration: Let them sit (unopened) in the installation space for 24–48 hours to stabilize.
- Installing in Extreme Temperatures
- Manufacturer Ranges: Many vinyl floors prefer 65°F–85°F (18°C–29°C). If the room is too cold or too hot, planks might not lock snugly or could warp later.
- Seasonal Awareness: In winter, run your home’s heating to simulate normal living conditions. In hot summers, consider air conditioning or dehumidifiers to keep humidity in check.
- Overusing/Underusing Adhesive
- Floating Floors: Click-lock vinyl typically needs no glue. Adding excessive adhesive restricts the planks from moving as needed.
- Méthode par collage: Follow the instructions for spread rate and open time. Using the wrong glue can lead to delamination or lumps.
- Rushing Layout Planning
- Measure Twice: Inconsistent plank sizes or angles can ruin the floor’s overall look.
- Underestimate Room Shape: L-shaped rooms, hallways, or obstacles like kitchen islands call for extra planning. A quick sketch or even a “dry run” with a few planks can help.
- Ignoring Subfloor Transitions
- Doorways: For smooth transitions, undercut door jambs or use thresholds. Forcing planks to fit can create stress points.
- Different Flooring Joins: Going from vinyl to tile or carpet? Transition strips ensure each surface “floats” or rests properly, preventing buckling.
Don’t-Do List Table
| What NOT to Do | Consequence |
|---|---|
| Skip Acclimation | Seam gaps, plank shifting |
| Install in Extreme Temperatures | Warped or improperly locked planks |
| Misuse Adhesives | Buckling, lumps, compromised floor movement |
| Rush Layout (No Measuring) | Unaligned seams, wasted planks, visual chaos |
| Ignore Transition Points | Floor tension, door fit issues, trip hazards |
A little extra caution in these areas prevents you from learning the hard way—like seeing your pristine new floor morph into a wavy mess after a few weeks.
V. Do You Need an Expansion Gap and Why?
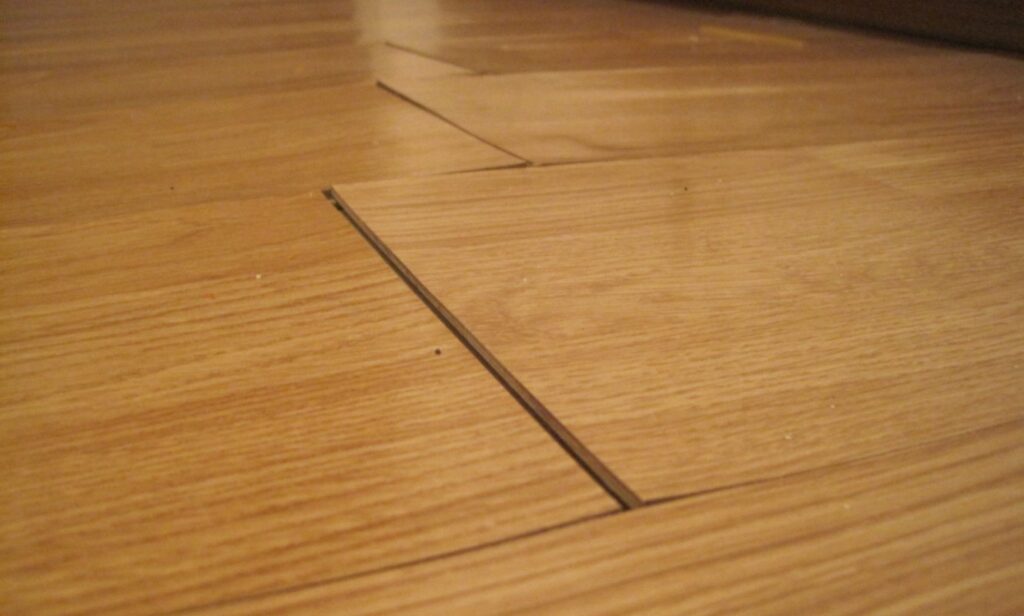
Absolutely. Vinyl planks expand and contract with temperature shifts. Leaving around a 1/4-inch gap at walls, door frames, and other fixed objects prevents buckling and ensures the floor can “breathe” comfortably.
Letting Your Floor Breathe
- Thermal Expansion Basics
- Yes, Vinyl Moves: Although vinyl is more dimensionally stable than wood, it’s not immune to heat and humidity changes.
- Small Shifts Add Up: Even tiny plank movements across a large floor can push against walls if no gap is left.
- Recommended Gap Sizes
- Standard Gap: Typically 1/4 inch (6 mm) is sufficient, but some brands may suggest 3/8 inch in extreme climates.
- Check Manufacturer Guidance: If your brand says 5 mm instead of 6 mm, follow that specifically.
- Using Spacers
- Perimeter Spacing: Place spacers between the wall and your first row of planks. Once you finish, remove them—your baseboard or quarter-round will cover the gap.
- Door Frames and Fixed Structures: Don’t wedge planks too tightly around pipes, islands, or built-in cabinetry. Cut or leave adequate clearance.
- Consequences of No Gap
- Buckling or Peaking: Planks might pop up in the middle if they can’t expand outward.
- Warped Edges: The edges near walls could curl if forced to “bunch up.”
- Seasonal Impact
- Cold to Hot: The floor installed in winter might expand in summer, so that initial gap is key.
- Managing Drastic Swings: If your home experiences big temperature changes, maintain consistent HVAC settings or at least be mindful if the floor sits unoccupied (e.g., vacation homes).
Conseil de pro: If you’re nervous about expansion gaps, do a small test area in a closet or less visible space. Watch how the planks behave over a couple of days before tackling the main living area.
VI. Are Misaligned Seams and Poor Layout Planning a Major Problem?
Yes—uneven seams or a chaotic layout can lead to structural weak spots, visible “pattern repeats,” and a less polished look. Proper staggering, measuring, and planning yield a sturdier, more attractive floor.
Layout and Seaming Like a Pro
- Staggering 101
- Consistent Offsets: Stagger seams by at least 6–8 inches each row to avoid lining them up in a straight line.
- Avoid H-Joints: An H-joint is where two seams in adjacent rows line up, creating a visual “H” that weakens overall stability.
- Starting Right
- First Row Placement: Make sure it’s straight and perfectly aligned with your chosen reference wall. A crooked first row can put the rest of the floor out of whack.
- Cut the First Plank: Many pros suggest cutting a partial plank to start the second row, ensuring seams don’t repeat.
- Planning Around Obstacles
- Doorways and Vents: Mark precisely, cut carefully. Even a small miscalculation can ruin the look around a vent grill.
- Kitchen Islands: If you have an island or peninsula, decide how the planks will run. Sometimes it’s best to start on one side to avoid awkward end pieces.
- Mock Layout
- Dry Fitting: Placing a few planks without locking them can reveal if your pattern alignment looks natural. Adjust before committing.
- Snapping Photos: If you’re on the fence about a pattern, snap a quick picture from different angles. It’s easier to spot symmetrical issues in a photo.
- Last Row Issues
- Too Narrow: If the final row ends up narrower than half a plank, it can look flimsy and be prone to shifting or lifting.
- Trim Early: You can pre-calculate how many rows fit across the room to avoid finishing with a tiny sliver.
A thoughtful layout ensures your vinyl planks blend seamlessly, giving the illusion of a continuous surface. Plus, it avoids that “I can’t unsee this crooked seam” vibe every time you enter the room.
VII. What Are the Proper Finishing Touches, and What Destroys Vinyl Plank Flooring?
Use trim or transition strips for a polished perimeter, and guard against heavy furniture, harsh chemicals, or standing water—these are the prime threats that can dent, discolor, or degrade vinyl planks prematurely.
Completing and Protecting Your Floor
- Finishing Edges with Trim
- Baseboards or Quarter-Round: They cover that 1/4-inch expansion gap around walls, making everything look neat.
- Bandes de transition: If you’re meeting tile, carpet, or other flooring materials, a transition strip prevents tripping hazards and keeps edges secure.
- Door Clearance and Fixtures
- Adjusting Doors: If your new floor is thicker than the old one, you might need to trim the door bottom so it doesn’t scrape.
- Threshold Reducers: For height differences between rooms, these smooth out the step-down so you don’t stub your toes or damage planks.
- What Destroys Vinyl Plank Flooring?
- Heavy Furniture Without Pads: Over time, the weight can cause dents or even tear the protective wear layer.
- Harsh or Abrasive Cleaners: Bleach, ammonia, or abrasive scrubbing pads can dull or scratch the floor. Stick to pH-neutral cleaners for a safe shine.
- Flooding or Pooling Water: While vinyl is water-resistant, consistent exposure to large amounts of water can seep into seams or degrade adhesives.
- Objets pointus: Dropping knives or dragging rough chair legs can gouge the planks.
- Entretien régulier
- Sweeping or Vacuuming: A soft-bristle broom or hard-floor vacuum mode picks up dirt and protects from micro-scratches.
- Nettoyage humide: Light, pH-neutral floor cleaners are enough. Avoid soaking the floor or leaving standing water behind.
- Soins de longue durée
- Felt Pads for Furniture: Cheap and easy solution to avoid scuffs. Also, reconsider rolling chairs if they have hard plastic wheels—opt for soft casters or a protective chair mat.
- Exposition au soleil: Prolonged direct sun can fade or discolor some vinyl types. Curtains, blinds, or UV-protective window films can help.
| Keyword | Brief Explanation |
| Trim | Finishes edges and conceals expansion gaps for a cleaner look |
| Bandes de transition | Smoothly connects vinyl to other flooring types, preventing bumps or trip risks |
| Door Clearance | Ensures doors swing freely, avoiding scraping or damage to the floor |
| Meubles lourds | Can dent or compress planks if placed without pads or protective measures |
| Harsh Chemicals | Bleach, ammonia, or abrasive cleaners that can dull or erode the wear layer |
| Standing Water | Excessive moisture that can seep into seams and cause warping or mold |
| Coussinets en feutre | Placed under furniture legs to prevent scratches, dents, and gouges |
| Nettoyage humide | A gentle cleaning method that uses minimal water and pH-neutral floor cleaners |
| Exposition aux UV | Prolonged sunlight can fade or discolor certain vinyl surfaces over time |
| Soins de longue durée | Regular sweeping, controlled moisture, and protective steps to keep planks intact |
By giving your new vinyl floor the finishing touches it deserves—plus a dash of everyday mindfulness—you’ll preserve that “just-installed” look for the long haul.
Conclusion: Which Best Practices Can Help You Avoid Common Vinyl Plank Flooring Mistakes?
Vinyl plank flooring can transform a space with its contemporary look, water-resistant technology, and easy upkeep. But let’s face it: rushing through installation without proper planning can lead to a litany of problems—like subfloor lumps, poorly cut edges, or neglected expansion gaps that cause warping. To lock in success, pay attention to the subfloor (level and dry!), acclimate planks to your home’s temperature, keep consistent expansion spaces, and map out your plank layout before you ever break out the utility knife. Little details, like trimming door bottoms or using baseboard molding, give a polished finish that will impress anyone stepping foot on your new floor.
Finally, remember that maintenance is more than an afterthought—gentle cleaning solutions, protecting high-traffic areas from grit, and using felt pads for heavy furniture are simple steps that keep vinyl planks looking pristine for years. If you’re second-guessing any step, consult the manufacturer’s guidelines or reach out for expert advice. It’s much easier (and cheaper) to do it right the first time than to correct mistakes once the floor is fully installed.
Ready to turn your space into a showpiece without the usual flooring headaches? N'hésitez pas à contacter Kinwin for a custom quote. Whether you have a tricky subfloor, an oddly shaped room, or specific durability needs, our SPC (Stone Plastic Composite) flooring solutions and professional guidance are here to make sure your installation goes off without a hitch. Get in touch today—let’s work together to create a stunning, trouble-free floor that matches your lifestyle and design dreams!